Support the Blog!

vudu.com

Saturday, April 30, 2011

ipad and iPhone together again via Midi

In today's tutorial, I show you how to share a Midi connection between your iPhone and iPad allowing you to play Nanostudio or Music Studio on the iPhone using Soundprism on the iPad.


Build your own Midi link:


Apps Mentioned:

Tuesday, April 26, 2011

The iPad & iPhone: Together at Last

The iPad is supposed to free us from desktops, right? So one of my goals with the iPad is to pull off projects without ever having to touch my Macbook. This is a bit harder with music projects but it can be done. This is where the iPhone comes in handy.

The iPhone really complements the iPad on music projects. Often times I want to use one app to play an instrument but use another app as a sequencer. Because let's face it, even the best instruments have pretty basic recorders.

Problem solved. I use the iPhone to play Thumbjam, iShred, or Guitarstudio and use the iPad to record with GarageBand, Studio HD or Nanostudio. This is easily facilitated with the iRig adaptor and 1/4" to 1/8" Stereo Adapter.

Not only can I now record and edit with GarageBand, I can also use it's amps and effects on the signal from the iPhone. See there, no desktop needed. In the next blog, I'll show you how to connect your iPhone and iPad via Midi. Have fun kids!

Items Mentioned:


- Posted using BlogPress from my iPad

Saturday, April 23, 2011

Songwriting on the iPad

     
Difficulty: Easy Peasy
Hassle: About as little as you can have on the iPad

Every kick-ass song must have kick-ass chords. The Beatles knew this, the Stones knew it and now you know it. As a lad, little Paul McCartney would even ride a bus across town just to learn a new chord. But of course Paul McCartney didn't have an iPad...or very protective parents for that matter.

The iPad is a songwriter's dream and not just because you can record a song without dealing with spastic drummers. With the iPad, you have all the chords in the universe right at your fingertips.

But it doesn't have to be complicated. Apps like iShred and Pianostudio can streamline the songwriting process if you know just a few chord basics.

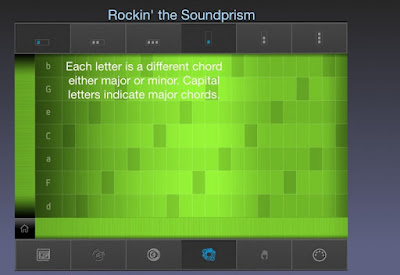
In popular music, there are just a handful of keys that are commonly played (E, A, D, C, and G) with just two basic modes for each key: Major and Minor.

Major is the bright, happy, Tigger mode while minor is the brooding, darker, Eeyore mode. While most songs will have elements of Major and Minor, it is enough to know that the E Major key is a happier sounding key than its cousin key of E Minor.

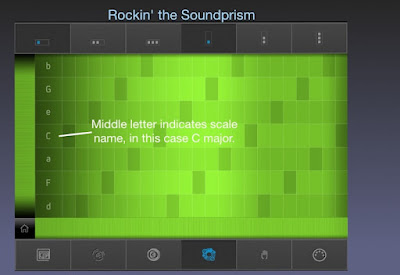
Each key is a family with a set of 7 basic chords. There are other chords in the extended family but we will just focus on the chords in the immediate family.

Finding Chords
Yes, there's an App for that. My favorite App for finding the chords in a key is appropriately named the Key Chords App.


Just select the key from the side and toggle either Major or Minor and you get a list of chords. The chords in the immediate family will be on the first row.

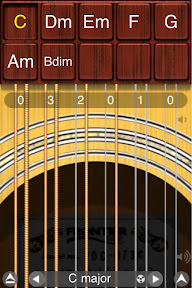
If you select C for instance you will get the following chord sequence:

I Chord: C Major
II Chord: D Minor
III Chord: E Minor
IV Chord: F Major
V Chord: G Major
VI Chord: A Minor
VII Chord: B Diminished

Click on any of the chords to hear them played. You can even create and play a chord sequence by dragging chords to the bottom bar.

Alternatively, you can find chords using a website like:

http://www.guitar-chords.org.uk/chordskey.html

You simply pick a key from the side bar and it will give you the list of chords in the selected key.

Now that you know what the common keys are and how to find the chords for each key, let's load up some chords in your favorite iPad apps.

Creating Song Templates on iShred and Guitarstudio Apps
These sibling apps are identical except that iShred generates electric guitar sounds while Guitarstudio generates acoustic guitar sounds.

To make the most use of these apps for songwriting, we will need to create songs. But instead of creating ordinary songs, we will create "templates" in each of the common keys using the seven chords that make up the key.

In iShred and Guitarstudio, setting up chords is fairly straightforward.
1. Create a new song by tapping the "New Song" menu item on the left hand menu.
2. You can then tap the name and change the song name to something like "C Major."
3. You will then populate the buttons with the chords from your key using the slide selector at the bottom. I recommend putting the chords in sequential order.
4. When you are finished with setting up the chords in the song, touch the "Save song and exit" item from the right hand menu.

Create additional songs for the other popular Major and Minor keys. When you're done, you should have several songs that look like these:


Creating Songs in Pianostudio
Navigating in Pianostudio isn't as intuitive as the Guitar apps are. You have to hold down the button in the top left corner in order to display the pop-up menu menu items.

1. Create a new song by tapping the "Songs" menu item on the righthand menu. Then select "New Song" from the Songs menu.
2. You can then set the song name to something like "C Major" and then tap the "Done" button.
3. Now tap "Editor" from the popup menu. Then tap the "Chords" button at the bottom to access the chord selection screen. You will then populate the buttons with the chords from your key. Be sure to place the chords in sequential order.
4. When you are finished with setting up the chords in the song, touch the "Done" button at the top right of the screen.

Your screen should look something like this:


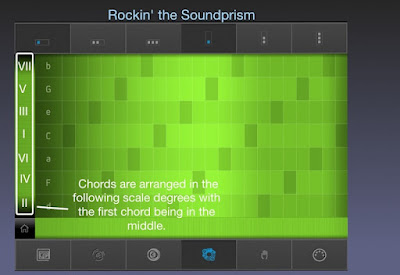
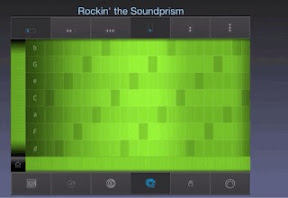
Using the Song Templates
Congratulations! Now that you have the song templates set up, writing songs is as easy as I-IV-V. Experiment with creating chord progressions in the different keys. Study the chord progressions of your favorite songs or use an App like Chord Bank Pro to find popular chord progressions.

If you are interested in learning more about chords and chord progressions, I recommend the books Chords and Progressions For Rock Guitar and How to Write Songs on Guitar:

Chords & Progressions For Rock Guitar (Guitar Books)    How To Write Songs On Guitar - Revised


Now go be Awesome!

Apps Mentioned:


- Posted using BlogPress from my iPad

Saturday, April 16, 2011

Better living through Vectors


Apps needed: iDraw app, JotNot Pro (optional)
Difficulty: Medium, Recommend using a simple sketch to work from.
Hassle: Some hassle may be involved in getting an image of your sketch loaded on the iPad.

About Vector Graphics
Vector graphics are a type of computer drawn art made from geometric shapes which scale to any size without losing definition or becoming pixelated. Vector art is popular in commercial graphics including logos, poster art, and children's books.

There are a number of vector art programs on the PC with Illustrator being the best known. Aviary.com has it's own flash based vector graphics program that is free and pretty feature rich.

On the iPad I like to use the iDraw app because I find it to be the easiest to use and capable of producing high-quality graphics. I've tried the other vector apps and they all make me feel like I'm engineering rather than creating art. iDraw is laid out intuitively and should have a short learning curve for you.

Today's Project
Today, I'm going to show you how to take a sketch like this:


To a vector graphic like this:


The Steps

1. First you'll need to get your sketch loaded on your iPad. Here's a few ways:

-email yourself a scan from your desktop. From your iPad's email, save to your Photo Album

-use an app like JotNot Pro to scan the image using your iPhone (or iPad 2). If you are scanning a pencil sketch, you'll want to set the presets to "Light Text or Backgrounds". Adjust as necessary and then email the photo to your iPad using the JPG format.

The sketch doesn't have to look perfect but be good enough to use as a template.

2. Load your image in iDraw and adjust the transparency for tracing.


3. Add a second layer for tracing your sketch.


Use the "Edit" button to name the layers and to move the new layer below the sketch. This will allow you to use the sketch as a template. The selected layer is highlighted in blue and indicates which layer any new drawings will appear on.

4. Begin tracing your sketch using the pencil tool. Use the color pallet to adjust the color of your drawings.

The pencil tool works...well like a pencil. But unlike traditional art programs, the shapes you create with the pencil are selectable and modifiable. If you are familiar with PowerPoint, the ability to resize and change the order of shapes will be familiar to you. Even changing color and border widths in iDraw is similar to the same functions in PowerPoint.


5. Build up background layers to enhance your image.

The easiest way to add some texture is to bring in a background image. I like to use images of paper like the rice paper shown below. You can find these images easily by searching Google images for "paper" and using the color and image size options to filter the results.


When you find a suitable image, touch and hold the image to save to your Photo Album. Now you could import the image as we did before but I want to share another technique that can be useful for creating shapes out of images.


For the remaining elements, I used simple shapes to build up furniture, using shadows to continue the cut-out look.


Well that's all there is to it. Remember to start out simple and gradually build up to more complicated images. In a future blog, I'll show you how you can even create photorealistic images with vectors. Now go be awesome!

-Milo


- Posted using BlogPress from my iPad

Rockin' the Soundprism


Skill: Easy Peasy
Hassle: About as little as you can have on the iPad

Ok, one may never "rock" with the Soundprism app but it is a great way to generate song ideas and for some, it may be an end in itself. The app only has 3 tones in its banks, but there's enough charm in those tones to create some nicely textured music. The app has even been used to create video game and movie soundtracks.

There are a lot of music apps out there but the selling point with Soundprism is it's easy to use interface. Anyone can pick it up and make music instantly. In fact you can't play a wrong note. In today's blog, I'm going to break down the secrets behind the mysterious interface and show you how to get the most out of the app.

When you first open the app, you're greeted with a simple interface. There's no sign that it's even a music app.


But just touch anywhere within the grid and chords and bass notes meld together in a synthesized symphony.

The first thing we want to do is turn the Pitch Labels switch to on. The settings are located by tapping the "Home" button in the bottom left. Once set to on, you will see a series of letters to the left of the grid. These are the chord names.


The capitalized letters represent the major chords while the small letters represent the minor chords. Tapping these letters will play a bass note. Tapping the grid to the right will play chords made from the neighboring notes.


There are 7 chords, one for every note in the scale. The chord in the middle represents the root chord or first note of the scale. This will also be the key the notes of the grid will belong to. By swiping the strip to the left of the notes, you can scroll to another key.


As you can see, the chords are not lined up in sequence but alternate in thirds. These "stacked thirds" form the basis for harmony in Western music. Restricting the grid to only the chords made up from the selected scale ensures that every combination of notes will mesh well together.


Now that you know the chord sequences, you can apply chord some popular chord progressions in your compositions. Here's a few you can try:

I, IV, V Progression
The most popular sequence in rock music. Used in everything from Johnny B. Goode to Hey Jude to well everything. Using the guide pictured above, you would play this progression by tapping C F and G in sequence.

I, VIm, IV, V Progression
Another staple of rock music.

I, IV, IIm, V

The chord progression from "American Pie" when played in the key of G.

Im, bVII, bVI, bVII
You may have noticed that Soundprism doesn't allow you to select minor chords as the root. For this minor sequence, you will need to scroll the grid to a place where the minor chord is in the position below the root note. For A minor the root will be C. This will allow you to play the sequence Am, G, F, G. Sound familiar? These are the chords behind Jimi Hendrix's cover of "All Along the Watchtower."


There a ton of possibilities once you understand the engine that's under the Soundprism hood. I will cover more on chord progressions in a later blog including how to build your own. But this is enough to get your feet wet.  If you come up with something good, share it in the comments below.  Now go be awesome.
-Milo

Sound prism is a free app available on the iPhone and iPad.


- Posted using BlogPress from my iPad
Location:Texas