One of the most rewarding experiences for an artist is seeing their work brought to life through animation. Thanks to the iPad, it's never been easier to design, produce, and distribute your own cartoons.
Over the next few posts, I will be covering the process for converting your static designs into dynamic animated characters starting with today's tutorial on character design.
DUM is the new Smart
One of the benefits of computer animation is the ability to create animated segments from a single drawing. I call this streamlined approach to animation the DUM method (Draw once, Use Many).
Using the DUM method, it's possible to transform a single sketch into a full cartoon simply through the use of vector based character design.
Tools
To take advantage of the DUM method, we will create a vector based character design using an app called iDraw.
For those new to vectors, vector art is created from basic shapes and lines using a computer. Vector based graphics can easily be reused and manipulated, making it well suited for animation. In fact, vector based animation now dominates commercials and TV cartoons thanks to desktop programs such as Illustrator and Flash.
 Vectors can be used to quickly create characters by combining simple shapes
 Vectors can also be used to create more complex art
I've used many different vector art programs but I find iDraw on the iPad to be the most functional and intuitive vector art program to be found anywhere. iDraw makes it easy to export your designs with transparent backgrounds, something that is essential for animation.
If you've never used iDraw before, I recommend taking a moment to review these iDraw tutorials:
Better Living Through Vectors:
http://flamingstylus.blogspot.com/2011/04/better-living-through-vectors.html
Vintage Art with Vectors:
http://flamingstylus.blogspot.com/2011/05/vintage-art-with-vectors.html
Now for the DUM Tutorial
Step 1: Prepare the Workspace
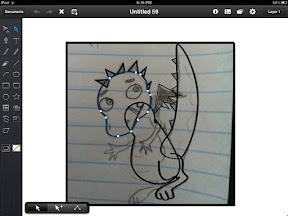
To start, create a new workspace in iDraw using the landscape layout. This will give you plenty of room for manipulating shapes. Import a sketch to use as a template for your vector by tapping the import button:

Now create a second layer to use for tracing vectors from your sketch.
Tip: I like to import photos of art from my journals or sketches from scrap pieces of paper to use as templates for my vector art.
Step 2: Trace Vectors from Your Template
Visualize your character as groups of body parts and character traits (head, arms, legs, eyes, hair, mouth, etc.).
Using the brush, pencil, pen, and shape tools, begin creating shapes for each major part by tracing your sketch. I recommend keeping the number of shapes to a minimum if this is your first time working with vectors. To save time, reuse parts where possible. A body part such as the left arm can be created from a mirrored copy of the right arm.
You can use the Close Path option from the Arrange menu to close any shapes with broken lines.

Don't worry about the colors or line styles too much as we will address those in the next step.
Tip: I recommend creating round shapes first with the brush or pencil tool and then using the pen tool to add points where needed. It's easier to add corners to round shapes than it is to add roundness to square shapes
Step 3: Refine Your Design
Now that all of your shapes are created, you can make choices on styling and colors. All of the line choices can be selected from the object information menu.

You can adjust the outlines to be thick or thin or even choose to have no outlines at all.
 Example of the style variations possible with vector art
Once you've applied styles and colors to all of the shapes, use the Arrange menu to order the shapes from front to back.
Finally, use the Group option under the Arrange menu to place your shapes into groups by body part. I prefer grouping parts to placing them on separate layers at this point as it is easier to make changes affecting multiple parts.
Tip: The point select tool can be used with the + option turned on to select multiple shapes by tapping on one shape at a time. This can make grouping much faster.

You can test your groupings by selecting a group, like an arm, and performing a rotation. You should see all of the shapes making up the arm rotate together.
At this point, your character design should have a finished look. Continue refining until you are satisfied with your results.

Step 4: Create Variations
Once you are satisfied with your design, you can begin creating different sets of traits such as mouths and eyes to allow your character to express emotion. iDraw will allow you to store these variations in folders using the Library menu.

I like to separate my traits out into different library folders (eyes, hair, mouths, etc) so that I can easily reuse them in future designs.
Optionally, you can make copies of your character from different perspectives using the front perspective as the starting point. For instance, the back view can easily be made from the front view by eliminating the front traits (eyes, mouths, front pockets, etc) and modifying the hair.
 All of these perspectives were created from variations of the front perspective
Tip:
All of these perspectives were created from variations of the front perspective
Tip: The quarter view perspective Can be created using the Skew tool on a copy of the front perspective.
 Step 5: Explode Your Design
The final step in the tutorial is to create an exploded view of your character. The exploded view separates your character into individual parts and is used for export your design into other apps for animating
You will want to separate any part that you plan on animating such as individual arms, legs or eyes. If a part will not be animated, there's no need to break it out.
For instance, if your cartoon only calls for movement in the right arm and mouth, then those are the only parts that you need to break out in the exploded view.
Sometime you might want multiple exploded views. For instance, if one scene calls for additional action you can create an exploded view that breaks your character into even more pieces. Just keep in mind that the more parts there are, the more work there is when animating a scene.
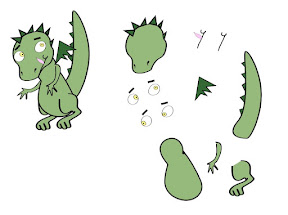
This exploded view pictured above will allow me to alternate the character's eyes and mouths as well as individually move the character's head, body, tail, arms, legs, and wing.
Wrap Up
Congratulations on completing your character design. You now know how to turn your drawings into vectors and how to prepare character designs for animation.
In the next tutorial I will get deeper into the animation process and we will create our first cartoon. In the meantime, please leave any comments or questions below.
If you like what you've seen in this tutorial, be sure to subscribe to my YouTube channel and follow me on Twitter. Most of my traffic now is related to music so be sure to tell your artist friends about the site and I will keep adding the art tutorials.
Until next time,
Milo

