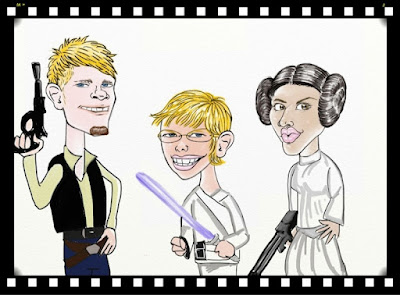
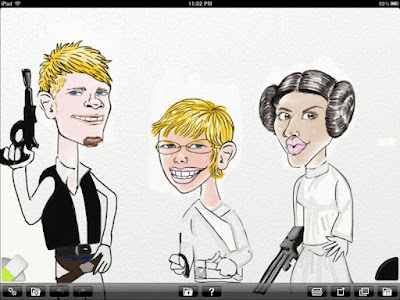
The finished project will look something like this:
For this project we'll need to create three portraits in Toon Face and then use an art program like Art Rage to bring the portraits together and draw them bodies.
Getting Familiar With ToonFace
I looked at various apps like Toonpaint and PhotoCartoon to tackle this project. I even tried a few face-warping apps to enhance the cartoon effect but they didn't come close to the results I eventually achieved with Toonface.
What makes Toonface special is that it let's you use professionally drawn artwork to create your own caricatures. The other apps just apply a smoothing filter and some random outlines. That just won't cut it.
Toonface is easy to use to boot. First there is a built in help page to get you started. There is also a help file you can access from the main menu.
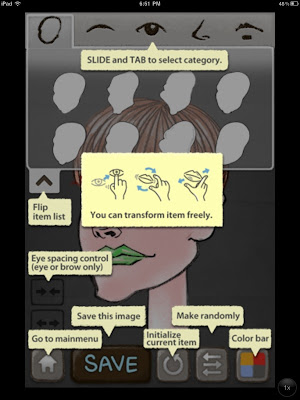
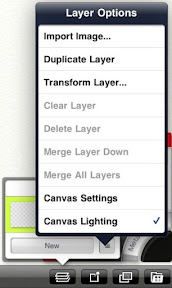
-Slide the ribbon to the far left to access the Background tab. There are some nice textured backgrounds but you will want to use a solid background so that your portraits can be merged together later.
-Once you save, you are unable to edit the portrait again. So be sure you are satisfied with the results before you save.
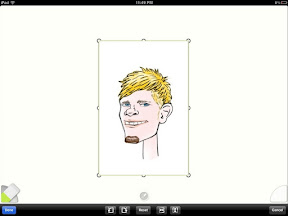
-Find a good picture to work from. Pay close attention to the shape of the head. Getting the right shape for the head is half the battle.
-Don't get hung up on getting the perfect nose, mouth and hair. This is a caricature so things will be exaggerated. Choose the one element that best captures the essence of the subject and the rest will fall in place.
-If the portrait isn't coming together like you want, try adjusting the distance of the eyes from each other or the distance of the mouth to the nose. A little tweak can make a big difference.
Once you're done creating a portrait, save and export to the Photo Gallery. Create the remaining portraits before moving on to Art Rage.
Finishing Your Caricature
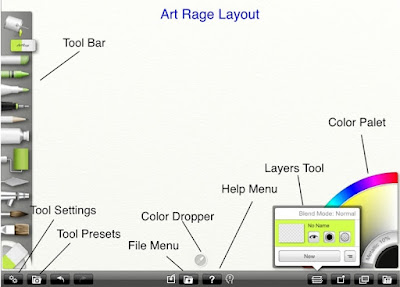
Art Rage is my favorite app to use whenever I want to replicate the look of traditional art. Watercolors, pastels, markers-you name it, Art Rage can do it.
Use the image below to familiarize yourself with Art Rage's layout.
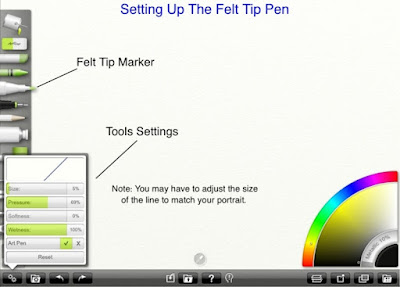
For our project, we will use the felt tip marker tool. You can see the settings I used in the image below.
Once you have your marker set up, you are ready to start importing the portraits from your iPad's Photo Album.
From the layers tool, tap Import Image from the popup menu located in the lower right corner of the layers tool.
Select your first portrait from the Photo Album. Your image will appear in Art Rage with additional tools to rotate and flip your portrait. Simple tap and drag to move the portrait. You can also pinch to resize the portrait to desired size.
Click the Done menu in the lower right corner to set the portrait and return to the Art Rage workspace screen.
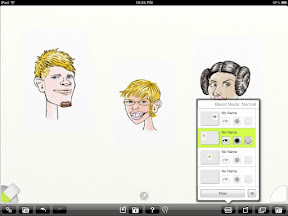
Repeat the import process until you have the portraits all loaded and in place.
It will appear as if you have just one unified image now. But If you click the Layers tool, you will see that you have a separate layer now for each imported image.
You can move between the layers by selecting the layer you want to edit. Tap the layer at the top to select it.
Now create a new layer by clicking the New button from the popup menu located at the bottom center of the Layers tool.
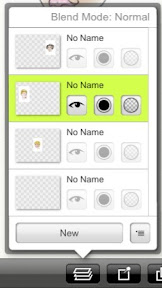
The new layer should appear at the top. This will be the layer we will draw the bodies on.
Begin drawing in the bodies with the felt tip marker tool on the top layer using the pallet on the right to change colors when needed.
Here's a few tips for rendering the bodies
-Adjust the line width on the marker to match the line width of the portraits to give the picture a unified look.
-Don't get hung up on the bodies being perfect. Just make sure the bodies are smaller in proportion to the heads in order to pull off the caricature look.
-You can match the pallet to the skin tones in the portraits simply by tapping the color dropper tool to the portraits.
-Save often! When done you can export your art to the Photo Gallery.
-Use a photo editor App like Photogene to crop the picture and add a border.
Congratulations! You now have a finished caricature you can share with friends and family. Drop a comment if you have any questions or just want to show off your own artwork.

Apps Mentioned


It can be even funnier, these caricatures can be then animated with PhotoPuppet HD - check out http://bit.ly/e04yFM
ReplyDeleteand photopuppet.com
PhotoPuppet HD is a cool app indeed. If you are interested in animation, stay tuned for details on my forthcoming book on creating animation on the iPad. PhotoPuppet is one of the apps I cover.
ReplyDelete