Apps needed: iDraw app, JotNot Pro (optional)
Difficulty: Medium, Recommend using a simple sketch to work from.
Hassle: Some hassle may be involved in getting an image of your sketch loaded on the iPad.
About Vector Graphics
Vector graphics are a type of computer drawn art made from geometric shapes which scale to any size without losing definition or becoming pixelated. Vector art is popular in commercial graphics including logos, poster art, and children's books.
There are a number of vector art programs on the PC with Illustrator being the best known. Aviary.com has it's own flash based vector graphics program that is free and pretty feature rich.
On the iPad I like to use the iDraw app because I find it to be the easiest to use and capable of producing high-quality graphics. I've tried the other vector apps and they all make me feel like I'm engineering rather than creating art. iDraw is laid out intuitively and should have a short learning curve for you.
Today's Project
Today, I'm going to show you how to take a sketch like this:

To a vector graphic like this:

The Steps
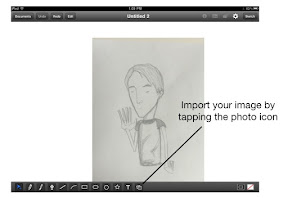
1. First you'll need to get your sketch loaded on your iPad. Here's a few ways:
-email yourself a scan from your desktop. From your iPad's email, save to your Photo Album
-use an app like JotNot Pro to scan the image using your iPhone (or iPad 2). If you are scanning a pencil sketch, you'll want to set the presets to "Light Text or Backgrounds". Adjust as necessary and then email the photo to your iPad using the JPG format.
The sketch doesn't have to look perfect but be good enough to use as a template.
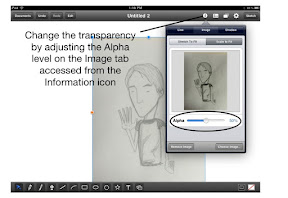
2. Load your image in iDraw and adjust the transparency for tracing.
3. Add a second layer for tracing your sketch.
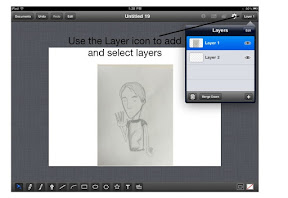
Use the "Edit" button to name the layers and to move the new layer below the sketch. This will allow you to use the sketch as a template. The selected layer is highlighted in blue and indicates which layer any new drawings will appear on.
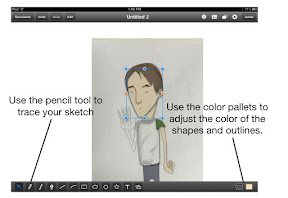
4. Begin tracing your sketch using the pencil tool. Use the color pallet to adjust the color of your drawings.
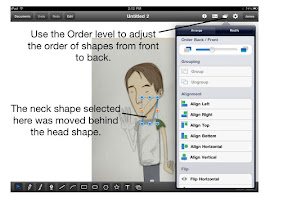
The pencil tool works...well like a pencil. But unlike traditional art programs, the shapes you create with the pencil are selectable and modifiable. If you are familiar with PowerPoint, the ability to resize and change the order of shapes will be familiar to you. Even changing color and border widths in iDraw is similar to the same functions in PowerPoint.
5. Build up background layers to enhance your image.
The easiest way to add some texture is to bring in a background image. I like to use images of paper like the rice paper shown below. You can find these images easily by searching Google images for "paper" and using the color and image size options to filter the results.
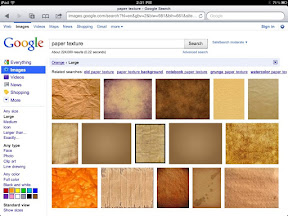
When you find a suitable image, touch and hold the image to save to your Photo Album. Now you could import the image as we did before but I want to share another technique that can be useful for creating shapes out of images.
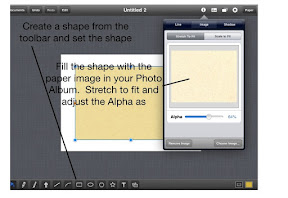
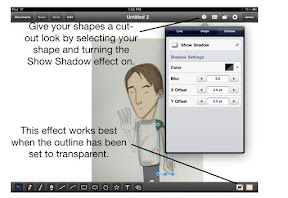
For the remaining elements, I used simple shapes to build up furniture, using shadows to continue the cut-out look.

Well that's all there is to it. Remember to start out simple and gradually build up to more complicated images. In a future blog, I'll show you how you can even create photorealistic images with vectors. Now go be awesome!
-Milo
- Posted using BlogPress from my iPad
This comment has been removed by a blog administrator.
ReplyDelete